Getting Started with Modding
Transcendence is much more than just the core universe. The Transcendence game engine allows everyone to make changes to the game, the game mechanics, the core storyline or just about anything you can think of. Mods are a very important part of what defines Transcendence.
This tutorial aims to get you started on building your own mods and is intended for those who have little or no prior experience in making mods for Transcendence. It will show all the basics needed to build a working extension and will try to explain some of the more important best practices along the way. This tutorial will not explain any scripting nor will it explain anything about creating game art: both these topics are worthy of their own tutorial, maybe even more than one.
At the end of this tutorial, you will end up with your own custom player ship, equipped with a newly invented cargo hold expansion, and you will have modified one of the weapons from the core universe. But, before we get to writing our own mod, we first have to do some preparations.
Part I: Get the source code
The first thing you need when you want to create a mod is the Transcendence source code. While having the source code is not necessary per se, it would be very stupid difficult to try creating an extension without this most useful resource. There are actually two methods of obtaining the source code: you can decompile the game data file yourself or you can download it through a (third-party) website. While the latter may seem easier, I would very much recommend choosing the first option: the more you can do yourself, the better a modder you will become.
Method 1: Decompiling the game data file
To decompile the game data file you need a little tool generously provided by Kronosaur Productions named TransData.
- Download the file and unpack it in the Transcendence installation folder (C:Program FilesTranscendence by default, but you may have placed it somewhere else).
- Open a command prompt (with administrator privileges) and go to the game’s installation folder.
- Enter the command:
TransData /decompile
And if everything went according to plan, you now have a new directory in your Transcendence installation folder named: Transcendence_Source.
Method 2: downloading a copy
If for some reason you don’t want to decompile the game data file, you can download a copy. While this method is certainly not frowned upon, it is not officially supported either. As a result, there is no guarantee that the latest version is available for download (yet). At the same time, the modding community around Transcendence is quite dedicated and it usually doesn't take more than a day or so before a copy of the latest version is uploaded.
- Open your favourite browser and navigate to: http://xelerus.de
- In the top menu click Mods and subsequently click on mods in the dropdown menu.
- Don't get distracted by all the cool mods available for download, just type source and hit enter.
- Search for the latest version number in the listed search results—make sure you get the correct version and not some beta version or something like that—and click the link.
- On the next page, click the big Download link. The archive you just downloaded should contain an identical copy of the source files obtained in method 1.
Whether you chose method 1 or method 2, you should now have a complete copy of all source files for the game (but not the source files for the game's engine, which is (almost completely) written in C++, available for download at Github, and not required for modding the game).
Feel free to browse through the files and view the image files, but be aware that, while it is very interesting, it is also one big spoiler. It may be more interesting to see a Teraton Nest for the first time while playing the game.
Part II: Registering your UNID
Every type of item, ship, station, nebula, planet or even piece of floating debris in the Transcendence universe is represented by its own unique identification number. These numbers are generally called UNID (which is of course a conjunction of Unique and ID, but I guess you figured that out by yourself already) and are generally written in hexadecimal form.
Because we humans are notoriously bad at remembering large lists of (semi-)arbitrary large numbers, we assign each number its own unique name in an entity declaration.
If you open the source file Transcendence.xml, you will see a (very) large list of entity declarations, for example:
<!ENTITY efFragmentationExplosion "0x00009007">
In this entity declaration the entity efFragmentationExplosion is set to represent the UNID 0x00009007. While these entities are only used in the source code (one of the first things the game engine does when loading the source files is replacing all entities by their corresponding number and forget about the names), they are an important part of the Transcendence source code and any mod you will write.
A UNID consists of several parts, as explained in a comment in the source code file Transcendence.xml (somewhere near line 1969):
<!--
(...)

UNID Namespace

0x D MMM T III

  D   Domain. This can be one of the following:

      0-9  Reserved for Transcendence
      A-C  Registered extensions (contact [email protected])
      D  Unregistered extensions (pick a random module ID)
      E  Unregistered extensions (pick a random module ID)
      F  Reserved (do not use)

  MMM Module ID. Registered extensions are assigned a single
      module ID to use for UNIDs. Unregistered extensions should
      use a random module ID (it is up to the user to manage
      unregistered extensions).

      (...)

  T   Type ID. Within a module, the division of the namespace is
      undefined. Transcendence uses this value to represent the
      type of object assigned an UNID:

      0  star system description
      1  sovereigns
      2  station types
      3  ship classes
      4  item types
      5  special item types (virtuals)

      8  random tables (items, encounters)
      9  effects, energy fields, space env, etc
      A  dock screens
      B  powers

      F  images and sound resources

  III ID. This can be any value unique within the module and type ID.
      This is generally a monotonically increasing number.

  Example:

  To create a playership extension, the ship class can be given an UNID
  like:

      0xD1A13001

      D    places this UNID in the unregistered extensions section.
      1A1  is a random number chosen by the extension creator.
      3	   is for ship classes.
      001  is the first ship class.

(...)
-->
Since we need to make sure that each UNID is unique (not just in your mod, but across all mods and the core universe), you will need your own unique four-digit prefix (which will form the first four digits of each UNID you declare). As can be read in the source code comment above, each person can choose a number in the range 0xD000 - 0xEFFF (unregistered extensions). Within this range, you can pick any number you like, provided it has not been taken by somebody else. You can find a list of all previously assigned UNID prefixes at the Transcendence Wiki. All you need to do to register your own UNID is choose a free four-digit prefix and ask on the forums to be included in the list. A community manager will make sure your choice gets added to the wiki. In this tutorial, I will use the prefix: 0xD1A1.
Part III: Declaring an Extension
Now that you've got a copy of the source code to serve as an example and your own personal prefix has been registered, the only thing left to do is start creating mods. Mods come in two types: adventures and extensions. An adventure is used to define a different game setting (a task slightly larger than we can handle in a tutorial) while an extension adds or changes something in an adventure. Most mods are extensions; almost everyone builds his ideas on top of the core universe.
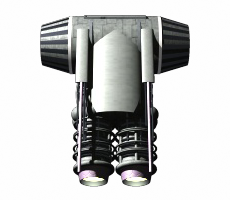
As promised at the start of this tutorial, we will write an extension that adds a new player ship to the game. More specific, we will create a player ship edition of the Hammerhead II-class gunship (because I think it looks cool and I could borrow the game art). So, as a first step, I create a new, empty XML file and save it as: HammerheadIIPlayership.xml.
<?xml version="1.0" encoding="utf-8"?>
Next, we (finally) declare our extension for Transcendence:
<?xml version="1.0" encoding="utf-8"?>

<!DOCTYPE TranscendenceExtension
    [
    <!ENTITY unidHammerheadIIPlayership     "0xD1A10000">
]>

<TranscendenceExtension
        UNID=           "&unidHammerheadIIPlayership;"
        apiVersion=     "22"
        name=           "Hammerhead II Playership"
        release=        "1"
        version=        "v1.00"
        credits=        "Pixelfck (Code), George Moromisato (Game art)"
        >

</TranscendenceExtension>
Let's explain the newly introduced code: the first thing you notice is the entity declaration (as mentioned in passing in part II of this tutorial). We start with declaring that all our entities will be part of a TranscendenceExtension. For now, I've only declared a single entity for this extension; it is set to represent the UNID 0xD1A10000.
Next comes the XML-element that will be expanded to contain all the code for our extension. The TranscendenceExtension element must have the following attributes:
- UNID: the entity representing the UNID for this extension, as defined in our entity declaration.
- apiVersion: the version of the game engine this mod is written for. This is a number that increases with every new release (including beta releases) of Transcendence. For Transcendence 1.3 the apiVersion is 22.
The TranscendenceExtension element should (best practice) have the following attributes:
- name: the name of your mod. This is the name that shows up in the list of extensions you can choose from when starting a new adventure.
- release: this attribute is reserved for future expansion. For now, it must be set to a value of 1.
- version: the version number for your mod. Most people give their first release number 1.0 and increase the number with each change they make and publish. The value for this attribute may contain letters as well as numbers.
- credits: the names of those who created this mod. In the example you can see that I (Pixelfck) am responsible for the code (and any errors in it) and George has created the game art. If you did not use anything made by others, there is of course no need to specify who did what and instead you can just enter your name here.
It is considered good practice to use the same name in the credits as you used when registering your personal prefix.
Part IV: Getting Organized
While we have by now created a technically valid extension for Transcendence, it doesn't yet do anything. So, we should add some more code. You could just continue in this same file; in fact, a lot of people have done so in the past. However, a lot of people have also noticed that, after a while, it gets hard to keep everything organized. So instead of waiting till your extension has grown into a chaotic evil baby elephant, let's organize our code from the beginning.
Transcendence offers two options for getting your code organized: libraries and modules. Libraries can be very useful, but are beyond the scope of this tutorial. Modules are a lot less complex and keep things organized just fine: a module is nothing more than moving part of your mod’s code into a separate file.
Let’s create a new XML file and save it as: ExtPlayerShip.xml:
<?xml version="1.0" encoding="utf-8"?>

<TranscendenceModule>

</TranscendenceModule>
The naming scheme for my module files signals two things (you are of course free to use any other naming scheme for your module files):
- ExtPlayerShip.xml: this file introduces new content (as opposed to modifying core universe entities).
- ExtPlayerShip.xml: this file contains (one or more) player ship definitions.
We now have an (empty) valid module file, but our extension doesn't know about it yet; we need to include the module in our extension:
<?xml version="1.0" encoding="utf-8"?>

<!DOCTYPE TranscendenceExtension
    [
    <!ENTITY unidHammerheadIIPlayership     "0xD1A10000">
]>

<TranscendenceExtension
        UNID=           "&unidHammerheadIIPlayership;"
        apiVersion=     "22"
        name=           "Hammerhead II Playership"
        release=        "1"
        version=        "v1.00"
        credits=        "Pixelfck (Code), George Moromisato (Game art)"
        >

    <Module filename="ExtPlayerShip.xml"/>

</TranscendenceExtension>
The Module element must have the filename attribute. By specifying a module, all code in the module file becomes an integral part of the extension.
Part V: The Player Ship
As mentioned before, we will create a player ship based on the Hammerhead II-class gunship. So, the best place to start is the Hammerhead II-class gunship as included in the Transcendence source. A search through the XML-files for "Hammerhead II" reveals that it is defined in the file OutlawMiners.xml near line 218. Let's start by simply copying the whole vanilla ship definition into our module file:
<?xml version="1.0" encoding="utf-8"?>

<TranscendenceModule>

    <!-- Hammerhead II-class Gunship -->

    <ShipClass UNID="&scHammerhead-II;"
            manufacturer=       "Earth Industries"
            class=              "Hammerhead II"
            type=               "gunship"

            mass=               "30"
            cargoSpace=         "10"
            thrustRatio=        "10"
            maxSpeed=           "16"

            leavesWreck=        "25"

            attributes=         "genericClass, outlawMiners"
            >

        <Armor>
            <ArmorSection
                    start="270"
                    span="180"
                    armorID="&itTitaniumPlate;"
                    />
            <ArmorSection
                    start="90"
                    span="180"
                    armorID="&itTitaniumPlate;"
                    />
        </Armor>

        <Devices>
            <Device deviceID="&itDualRecoillessCannon;"/>
            <Device deviceID="&itClass1Deflector;"/>
        </Devices>

        <Maneuver
            maxRotationRate=    "18.0"
            rotationAccel=      "2.0"
            />

        <Image
                imageID="&rsSmallShips1;"
                imageX="64" imageY="0"
                imageWidth="32" imageHeight="32"
                imageFrameCount="0" imageTicksPerFrame="0"
                />

        <Effects>
            <Effect
                    type="thrustMain"
                    posAngle="167" posRadius="15" posZ="3"
                    rotation="180"
                    />
            <Effect
                    type="thrustMain"
                    posAngle="-167" posRadius="15" posZ="3"
                    rotation="180"
                    />
        </Effects>

        <AISettings
            fireRateAdj=        "30"
            fireRangeAdj=       "50"
            fireAccuracy=       "90"
            perception=         "4"

            combatStyle=        "advanced"
            />

    </ShipClass>

</TranscendenceModule>
Since we do not want to modify the existing Hammerhead II, but want to create something new instead, we need to define a new entity for it in the extensions declaration in file (HammerheadIIPlayership.xml):
<?xml version="1.0" encoding="utf-8"?>

<!DOCTYPE TranscendenceExtension
    [
    <!ENTITY unidHammerheadIIPlayership     "0xD1A10000">

    <!-- ship classes -->

    <!ENTITY scHammerheadIIPlayer           "0xD1A13001">

]>

<TranscendenceExtension
        UNID=           "&unidHammerheadIIPlayership;"
        apiVersion=     "22"
        name=           "Hammerhead II Playership"
        release=        "1"
        version=        "v1.00"
        credits=        "Pixelfck (Code), George Moromisato (Game art)"
        >

    <Module filename="ExtPlayerShip.xml"/>

</TranscendenceExtension>
The newly added entity declaration line defines scHammerheadIIPlayer to represent UNID 0xD1A13001.
Next, I replace the UNID attribute's value in our ShipClass element with the newly declared entity:
<?xml version="1.0" encoding="utf-8"?>

<TranscendenceModule>

    <!-- Hammerhead II-class Gunship -->

    <ShipClass UNID="&scHammerheadIIPlayer;"
            manufacturer=       "Earth Industries"
            class=              "Hammerhead II"
            type=               "gunship"

            mass=               "30"
            cargoSpace=         "10"
            thrustRatio=        "10"
            maxSpeed=           "16"

            leavesWreck=        "25"

            attributes=         "genericClass, outlawMiners"
            >

        <Armor>
            <ArmorSection
                    start="270"
                    span="180"
                    armorID="&itTitaniumPlate;"
                    />
            <ArmorSection
                    start="90"
                    span="180"
                    armorID="&itTitaniumPlate;"
                    />
        </Armor>

        <Devices>
            <Device deviceID="&itDualRecoillessCannon;"/>
            <Device deviceID="&itClass1Deflector;"/>
        </Devices>

        <Maneuver
            maxRotationRate=    "18.0"
            rotationAccel=      "2.0"
            />

        <Image
                imageID="&rsSmallShips1;"
                imageX="64" imageY="0"
                imageWidth="32" imageHeight="32"
                imageFrameCount="0" imageTicksPerFrame="0"
                />

        <Effects>
            <Effect
                    type="thrustMain"
                    posAngle="167" posRadius="15" posZ="3"
                    rotation="180"
                    />
            <Effect
                    type="thrustMain"
                    posAngle="-167" posRadius="15" posZ="3"
                    rotation="180"
                    />
        </Effects>

        <AISettings
            fireRateAdj=        "30"
            fireRangeAdj=       "50"
            fireAccuracy=       "90"
            perception=         "4"

            combatStyle=        "advanced"
            />

    </ShipClass>

</TranscendenceModule>
Since this ShipClass element is now bound by its own unique UNID, the ship will be a new, independently existing type of ship. But it is not a player ship yet; for a player ship, we need to specify various extra bits. Most notably, we need to specify what UI-elements to use and how to align them. We also need to specify some other things such as a description and the amount of starting credits. Fortunately, this whole player-specific section is enclosed in the PlayerSettings element:
<?xml version="1.0" encoding="utf-8"?>

<TranscendenceModule>

    <!-- Hammerhead II-class Gunship -->

    <ShipClass UNID="&scHammerheadIIPlayer;"
            manufacturer=       "Earth Industries"
            class=              "Hammerhead II"
            type=               "gunship"

            mass=               "30"
            cargoSpace=         "10"
            thrustRatio=        "10"
            maxSpeed=           "16"

            leavesWreck=        "25"

            attributes=         "genericClass, outlawMiners"
            >

        <Armor>
            <ArmorSection
                    start="270" span="180"
                    armorID="&itTitaniumPlate;"
                    />
            <ArmorSection
                    start="90" span="180"
                    armorID="&itTitaniumPlate;"
                    />
        </Armor>

        <Devices>
            <Device deviceID="&itDualRecoillessCannon;"/>
            <Device deviceID="&itClass1Deflector;"/>
        </Devices>

        <Maneuver
            maxRotationRate=    "18.0"
            rotationAccel=      "2.0"
            />

        <Image
                imageID="&rsSmallShips1;"
                imageX="64" imageY="0"
                imageWidth="32" imageHeight="32"
                imageFrameCount="0" imageTicksPerFrame="0"
                />

        <Effects>
            <Effect
                    type="thrustMain"
                    posAngle="167" posRadius="15" posZ="3"
                    rotation="180"
                    />
            <Effect
                    type="thrustMain"
                    posAngle="-167" posRadius="15" posZ="3"
                    rotation="180"
                    />
        </Effects>

        <AISettings
            fireRateAdj=        "30"
            fireRangeAdj=       "50"
            fireAccuracy=       "90"
            perception=         "4"

            combatStyle=        "advanced"
            />

        <!-- Playership settings -->

        <PlayerSettings
                desc=               "The Hammerhead II-class gunship
needs a cool description."
                largeImage=         "&rsHammerheadIILarge;"
                initialClass=       "true"
                startingCredits=    "10d100+1500"

                startingSystem=     "SE"
                startingPos=        "Start"
                >

            <ArmorDisplay>
                <ShipImage
                        imageID="&rsArmorHUDShip_HammerheadII;"
                        imageWidth="136" imageHeight="136"
                        />

                <ArmorSection name="forward"
                        imageID="&rsHammerheadIIArmor;"

                        imageX="0" imageY="0"
                        imageWidth="79" imageHeight="27"
                        destX="29" destY="20" hpX="55" hpY="18"
                        nameY="8" nameBreakWidth="200"
                        nameDestX="0" nameDestY="10" />

                <ArmorSection name="port trailing"
                        imageID="&rsHammerheadIIArmor;"
                        imageX="0" imageY="135"
                        imageWidth="48" imageHeight="73"
                        destX="19" destY="48" hpX="13" hpY="60"
                        nameY="30" nameBreakWidth="360"
                        nameDestX="12" nameDestY="0"
                        />

                <ArmorSection name="starboard trailing"
                        imageID="&rsHammerheadIIArmor;"
                        imageX="49" imageY="135"
                        imageWidth="48" imageHeight="73"
                        destX="70" destY="48" hpX="97" hpY="60"
                        nameY="52" nameBreakWidth="200"
                        nameDestX="0" nameDestY="8"
                        />

            </ArmorDisplay>

            <ShieldDisplay shieldLevelEffect="&efShieldHUDDefault;" />

            <ReactorDisplay>
                <Image  imageID="&rsZubrinReactor;"
                        imageX="0" imageY="0"
                        imageWidth="256" imageHeight="60"
                        />

                <PowerLevelImage imageID="&rsZubrinReactor;"
                        imageX="0" imageY="60"
                        imageWidth="202" imageHeight="14"
                        destX="54" destY="9"
                        />

                <FuelLevelImage imageID="&rsZubrinReactor;"
                        imageX="0" imageY="74"
                        imageWidth="194" imageHeight="14"
                        destX="54" destY="37"
                        />

                <FuelLowLevelImage imageID="&rsZubrinReactor;"
                        imageX="0" imageY="88"
                        imageWidth="194" imageHeight="14"
                        />

                <ReactorText    x="62" y="22" width="154" height="14"/>
                <PowerLevelText x="62" y="0"  width="154" height="9"/>
                <FuelLevelText  x="62" y="51" width="154" height="9"/>
            </ReactorDisplay>

            <WeaponDisplay>
                <Image  imageID="&rsZubrinTargeting;"
                        imageX="0" imageY="0"
                        imageWidth="360" imageHeight="120"
                        />
            </WeaponDisplay>
        </PlayerSettings>
    </ShipClass>

</TranscendenceModule>
I'm not going to explain every single aspect of the player ship specific settings, there is simply too much to cover in a single tutorial. Instead, I'll only explain the more complicated part of it: the armor segments. First of all, you may have spotted an obvious inconsistency: our player ship has two segments of armor defined in the PlayerSettings element, while I've added UI-components for three armor segments... The default Hammerhead II only has two armor segments while most player ships come equipped with four armor segments (which equates to twice as much armor). As a compromise I've given the player ship edition of the Hammerhead II an extra segment of armor (or maybe I just needed an excuse to explain more about armor segment configuration). So, let's add the extra armor segment to the Armor element in our ship's configuration.
<?xml version="1.0" encoding="utf-8"?>

<TranscendenceModule>

    <!-- Hammerhead II-class Gunship -->

    <ShipClass UNID="&scHammerheadIIPlayer;"
            (...)
            >

        <Armor>
            <ArmorSection
                    start="300" span="120"
                    armorID="&itTitaniumPlate;"
                    />
            <ArmorSection
                    start="60" span="120"
                    armorID="&itTitaniumPlate;"
                    />
            <ArmorSection
                    start="180" span="120"
                    armorID="&itTitaniumPlate;"
                    />
        </Armor>

        (...)

        <!-- Playership settings -->

        <PlayerSettings
                (...)
                >

            <ArmorDisplay>
                (...)

                <ArmorSection name="forward"
                        imageID="&rsHammerheadIIArmor;"

                        imageX="0" imageY="0"
                        imageWidth="79" imageHeight="27"
                        destX="29" destY="20" hpX="55" hpY="18"
                        nameY="8" nameBreakWidth="200"
                        nameDestX="0" nameDestY="10" />

                <ArmorSection name="port trailing"
                        imageID="&rsHammerheadIIArmor;"
                        imageX="0" imageY="135"
                        imageWidth="48" imageHeight="73"
                        destX="19" destY="48" hpX="13" hpY="60"
                        nameY="30" nameBreakWidth="360"
                        nameDestX="12" nameDestY="0"
                        />

                <ArmorSection name="starboard trailing"
                        imageID="&rsHammerheadIIArmor;"
                        imageX="49" imageY="135"
                        imageWidth="48" imageHeight="73"
                        destX="70" destY="48" hpX="97" hpY="60"
                        nameY="52" nameBreakWidth="200"
                        nameDestX="0" nameDestY="8"
                        />

            </ArmorDisplay>

            (...)

        </PlayerSettings>
    </ShipClass>

</TranscendenceModule>
So, instead of two armor segments (each spanning a 180° arc), we have now defined three armor segments each spanning a 120° arc. I could try to explain in words how the game figures which armor section covers which direction, but I figured an image would explain it much better:
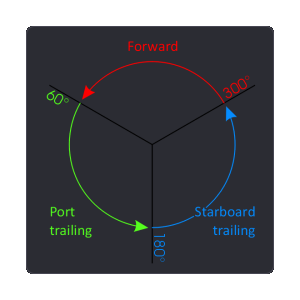 Each armor segment starts at start degrees and covers span degrees of a circle in a counterclockwise direction.
The armorID attribute specifies that this player ship is equipped with armor segments of type &itTitaniumPlate; (titanium armor).
For player ships, the armor segments have to be defined in the same order as the ArmorSection elements as defined in the ArmorDisplay part of the PlayerSettings. Since the ArmorDisplay part defines in which order armor segments are listed in the UI (armor repair lists, etc.), getting it all working as intended may feel a bit counterintuitive at first.
While all required elements of the player ship have now been included, we need to specify some extra attributes to the ShipType element before we have fully transformed an ordinary ship into a player ship.
<?xml version="1.0" encoding="utf-8"?>

<TranscendenceModule>

    <ShipClass UNID="&scHammerheadIIPlayer;"
            manufacturer=       "Earth Industries"
            class=              "Hammerhead II"
            type=               "gunship"

            attributes=         "00200000_PlayerShip"
            characterClass=     "&unidPilgrimClass;"

            mass=               "30"
            cargoSpace=         "10"
            thrustRatio=        "10"
            maxSpeed=           "16"

            reactorPower=       "100"
            fuelCapacity=       "37500"
            maxArmor=           "6000"
            maxCargoSpace=      "150"
            maxDevices=         "6"
            maxNonWeapons=      "4"

            leavesWreck=        "25"
            >

        (...)

    </ShipClass>

</TranscendenceModule>
Next, let's add some starting equipment:
<?xml version="1.0" encoding="utf-8"?>

<TranscendenceModule>

    <ShipClass UNID="&scHammerheadIIPlayer;"
            (...)
            >

        (...)

        <Items>
            <Item count="4d6" item="&itHelium3FuelRod;"/>
            <Table>
                <Item chance="20" count="1" item="&itWeaponSpeedROM;"/>
                <Item chance="30" count="1" item="&itEnhanceShieldsROM;"
                        />
                <Item chance="50"
                        count="1"
                        item="&itTargetingComputerROM;"
                        />
            </Table>
        </Items>

        (...)

    </ShipClass>

</TranscendenceModule>
So, from now on, our player ship will start with 4 × 1 to 6 &itHelium3FuelRod; (helium³ fuel rods) and one of the three items listed in the Table element (50% chance of starting out with a targeting program ROM!).
Declaring Resources
You may have noticed that by now we have referenced several entities which are not part of the core universe and which we did not specify in the entity declaration: &rsHammerheadIILarge;, &rsArmorHUDShip_HammerheadII; and (3 ×) &rsHammerheadIIArmor;. Referencing non-declared entities will result in an error, so we may as well define those resource entities right now (in file HammerheadIIPlayership.xml):
<?xml version="1.0" encoding="utf-8"?>

<!DOCTYPE TranscendenceExtension
    [
    <!ENTITY unidHammerheadIIPlayership     "0xD1A10000">

    <!-- ship classes -->

    <!ENTITY scHammerheadIIPlayer           "0xD1A13001">

    <!-- image and sound resources -->

    <!ENTITY rsHammerheadIIGunshipHD        "0xD1A1F001">
    <!ENTITY rsHammerheadIIArmor            "0xD1A1F002">
    <!ENTITY rsArmorHUDShip_HammerheadII    "0xD1A1F003">
    <!ENTITY rsHammerheadIILarge            "0xD1A1F004">

]>

<TranscendenceExtension
        (...)
        >

    (...)

</TranscendenceExtension>
Wait, what, four new resource entities? Well, the core universe Hammerhead-II has only 20 facings, while we would like to have a sprite with 120 facings for our playership, so I took the liberty of sneaking in the &rsHammerheadIIGunshipHD; entity.
Now that we have declared the entities for our resources, we still need to add them to our extension:
<?xml version="1.0" encoding="utf-8"?>

<TranscendenceModule>

    <!-- Player Ship: Hammerhead II-class Gunship -->

    <ShipClass UNID="&scHammerheadIIPlayer;"
            (...)
            >

        (...)

        <!-- Image and Effects -->

        <Image  imageID="&rsHammerheadIIGunshipHD;"
                imageX="0" imageY="0"
                imageWidth="32" imageHeight="32"
                rotationCount="120"
                />

        (...)

    </ShipClass>

    <!-- Resources -->

    <Image  UNID="&rsHammerheadIIArmor;"
            bitmap="Resources\ArmorHUD_HammerheadII.bmp"
            />
    <Image  UNID="&rsArmorHUDShip_HammerheadII;"
            bitmap="Resources\ArmorHUDShip_HammerheadII.jpg"
            />
    <Image  UNID="&rsHammerheadIILarge;"
            bitmap="Resources\HammerheadIILarge.jpg"
            bitmask="Resources\HammerheadIILargeMask.bmp"
            loadOnUse="true"/>
    <Image  UNID="&rsHammerheadIIGunshipHD;"
            bitmap="Resources\HammerheadIIGunshipHD.jpg"
            bitmask="Resources\HammerheadIIGunshipHDMask.bmp"
            />

</TranscendenceModule>
So, with that we have both added our newly introduced resources and changed the ship's main sprite into a 120 facings edition.
So, what else can we do to make our player ship fill some interesting niche? Considering it is widely used by the outlaw miners, I thought it would be cool to give it a little extra in terms of starting equipment, something which shows the ship’s roots: let's add a small miner's cargo hold.
Since a miner’s cargo hold is something completely different from a starship, it wouldn't be appropriate to add it to the ExtPlayerShip.xml file. Instead, I will create a new module for this device.
Following the naming scheme for my module files introduced earlier, our new module file will be ExtDevices.xml:
- ExtDevices.xml: this file introduces new content (as opposed to modifying core universe entities).
- ExtDevices.xml: this file contains (miscellaneous) devices.
The empty module file:
<?xml version="1.0" encoding="utf-8"?>

<TranscendenceModule>

</TranscendenceModule>
Let's add this module to our extension's main file and define an entity for our small miner's cargo hold:
<?xml version="1.0" encoding="utf-8"?>

<!DOCTYPE TranscendenceExtension
    [
    <!ENTITY unidHammerheadIIPlayership     "0xD1A10000">

    <!-- ship classes -->

    <!ENTITY scHammerheadIIPlayer           "0xD1A13001">

    <!-- item types -->

    **<!ENTITY itSmallMinersCargoHold         "0xD1A14001">**

    <!-- image and sound resources -->

    <!ENTITY rsHammerheadIIGunshipHD        "0xD1A1F001">
    <!ENTITY rsHammerheadIIArmor            "0xD1A1F002">
    <!ENTITY rsArmorHUDShip_HammerheadII    "0xD1A1F003">
    <!ENTITY rsHammerheadIILarge            "0xD1A1F004">

]>

<TranscendenceExtension
        UNID=           "&unidHammerheadIIPlayership;"
        apiVersion=     "22"
        name=           "Hammerhead II Playership"
        release=        "1"
        version=        "v1.00"
        credits=        "Pixelfck (Code), George Moromisato (Game art)"
        >

    <Module filename="ExtPlayerShip.xml"/>
    <Module filename="ExtDevices.xml"/>

</TranscendenceExtension>
Our small miner’s cargo hold will be a modified edition of the core universe's miner's cargo hold. Effectively this means that I copy the item from StdDevices.xml file and paste it in our new module file (ExtDevices.xml) and make sure we replace the item's UNID attribute value with our own newly defined entity:
<?xml version="1.0" encoding="utf-8"?>

<TranscendenceModule>

    <!-- Miner's Cargo Hold -->

    <ItemType **UNID="&itSmallMinersCargoHold;"**
            name=               "miner's cargo hold"
            level=              "3"
            value=              "1500"
            mass=               "1250"
            frequency=          "rare"
            numberAppearing=    "1"
            attributes=         "MajorItem; MinersHold"

            description=        "Designed for mining ships, this cargo
hold has grapples to bring ore on board."

            sortName=           "cargo hold, miners"
            >

        <Image  imageID="&rsItems1;"
                imageX="96" imageY="192"
                imageWidth="96" imageHeight="96"
                />

        <CargoHoldDevice
                cargoSpace=     "80"
                />

    </ItemType>

</TranscendenceModule>
I then change the item's name, description, value and mass; the extra cargoSpace it provides, as well as the item's sortName and frequency:
<?xml version="1.0" encoding="utf-8"?>

<TranscendenceModule>

    <!-- Small miner's Cargo Hold -->

    <ItemType UNID="&itSmallMinersCargoHold;"
            name=               "small miner's cargo hold"
            level=              "3"
            value=              "500"
            mass=               "650"
            frequency=          "uncommon"
            numberAppearing=    "1"
            attributes=         "MajorItem, MinersHold"

            description=        "Designed for mining support ships, this
cargo hold has scoops to bring ore on board."

            sortName=           "cargo hold, miners, small"
            >

        <Image  imageID="&rsItems1;"
                imageX="96" imageY="192"
                imageWidth="96" imageHeight="96"
                />

        <CargoHoldDevice
                cargoSpace=     "30"
                />

    </ItemType>

</TranscendenceModule>
And of course, we need to add the newly created device to our player ship:
<?xml version="1.0" encoding="utf-8"?>

<TranscendenceModule>

    <!-- Player Ship: Hammerhead II-class Gunship -->

    <ShipClass UNID="&scHammerheadIIPlayer;"
            manufacturer=       "Earth Industries"
            class=              "Hammerhead II"
            type=               "gunship"

            attributes=         "00200000_PlayerShip"
            characterClass=     "&unidPilgrimClass;"

            mass=               "30"
            cargoSpace=         "10"
            thrustRatio=        "10"
            maxSpeed=           "16"

            reactorPower=       "100"
            fuelCapacity=       "37500"
            maxArmor=           "6000"
            maxCargoSpace=      "150"
            maxDevices=         "6"
            maxNonWeapons=      "4"

            leavesWreck=        "25"
            >

        <Armor>
            <ArmorSection
                    start="300" span="120"
                    armorID="&itTitaniumPlate;"
                    />
            <ArmorSection
                    start="60" span="120"
                    armorID="&itTitaniumPlate;"
                    />
            <ArmorSection
                    start="180" span="120"
                    armorID="&itTitaniumPlate;"
                    />
        </Armor>

        <Devices>
            <Device deviceID="&itDualRecoillessCannon;"/>
            <Device deviceID="&itClass1Deflector;"/>
            <Device deviceID="&itSmallMinersCargoHold;"/>
        </Devices>

        <Maneuver
                maxRotationRate=    "18.0"
                rotationAccel=      "2.0"
                />

        <Items>
            <Item count="4d6" item="&itHelium3FuelRod;"/>
            <Table>
                <Item chance="20" count="1" item="&itWeaponSpeedROM;"/>
                <Item chance="30" count="1" item="&itEnhanceShieldsROM;"
                        />
                <Item chance="50"
                        count="1"
                        item="&itTargetingComputerROM;"
                        />
            </Table>
        </Items>

        <!-- Image and Effects -->

        <Image  imageID="&rsHammerheadIIGunshipHD;"
                imageX="0" imageY="0"
                imageWidth="32" imageHeight="32"
                rotationCount="120"
                />

        <Effects>
            <Effect type="thrustMain"
                    posAngle="167" posRadius="15" posZ="3"
                    rotation="180"
                    />
            <Effect type="thrustMain"
                    posAngle="-167" posRadius="15" posZ="3"
                    rotation="180"
                    />
        </Effects>

        <AISettings
                fireRateAdj=        "30"
                fireRangeAdj=       "50"
                fireAccuracy=       "90"
                perception=         "4"

                combatStyle=        "advanced"
                />

        <!-- Playership settings -->

        <PlayerSettings
                desc=               "The Hammerhead II-class gunship
needs a cool description."
                largeImage=         "&rsHammerheadIILarge;"
                initialClass=       "true"
                startingCredits=    "10d100+1500"

                startingSystem=     "SE"
                startingPos=        "Start"
                >

            <ArmorDisplay>
                <ShipImage
                        imageID="&rsArmorHUDShip_HammerheadII;"
                        imageWidth="136" imageHeight="136"
                        />

                <ArmorSection name="forward"
                        imageID="&rsHammerheadIIArmor;"

                        imageX="0" imageY="0"
                        imageWidth="79" imageHeight="27"
                        destX="29" destY="20" hpX="55" hpY="18"
                        nameY="8" nameBreakWidth="200"
                        nameDestX="0" nameDestY="10" />

                <ArmorSection name="port trailing"
                        imageID="&rsHammerheadIIArmor;"
                        imageX="0" imageY="135"
                        imageWidth="48" imageHeight="73"
                        destX="19" destY="48" hpX="13" hpY="60"
                        nameY="30" nameBreakWidth="360"
                        nameDestX="12" nameDestY="0"
                        />

                <ArmorSection name="starboard trailing"
                        imageID="&rsHammerheadIIArmor;"
                        imageX="49" imageY="135"
                        imageWidth="48" imageHeight="73"
                        destX="70" destY="48" hpX="97" hpY="60"
                        nameY="52" nameBreakWidth="200"
                        nameDestX="0" nameDestY="8"
                        />

            </ArmorDisplay>

            <ShieldDisplay shieldLevelEffect="&efShieldHUDDefault;" />

            <ReactorDisplay>
                <Image  imageID="&rsZubrinReactor;"
                        imageX="0" imageY="0"
                        imageWidth="256" imageHeight="60"
                        />

                <PowerLevelImage imageID="&rsZubrinReactor;"
                        imageX="0" imageY="60"
                        imageWidth="202" imageHeight="14"
                        destX="54" destY="9"
                        />

                <FuelLevelImage imageID="&rsZubrinReactor;"
                        imageX="0" imageY="74"
                        imageWidth="194" imageHeight="14"
                        destX="54" destY="37"
                        />

                <FuelLowLevelImage imageID="&rsZubrinReactor;"
                        imageX="0" imageY="88"
                        imageWidth="194" imageHeight="14"
                        />

                <ReactorText    x="62" y="22" width="154" height="14"/>
                <PowerLevelText x="62" y="0"  width="154" height="9"/>
                <FuelLevelText  x="62" y="51" width="154" height="9"/>
            </ReactorDisplay>

            <WeaponDisplay>
                <Image  imageID="&rsZubrinTargeting;"
                        imageX="0" imageY="0"
                        imageWidth="360" imageHeight="120"
                        />
            </WeaponDisplay>
        </PlayerSettings>
    </ShipClass>

    <!-- Resources -->

    <Image  UNID="&rsHammerheadIIArmor;"
            bitmap="Resources\ArmorHUD_HammerheadII.bmp"
            />
    <Image  UNID="&rsArmorHUDShip_HammerheadII;"
            bitmap="Resources\ArmorHUDShip_HammerheadII.jpg"
            />
    <Image  UNID="&rsHammerheadIILarge;"
            bitmap="Resources\HammerheadIILarge.jpg"
            bitmask="Resources\HammerheadIILargeMask.bmp"
            loadOnUse="true"/>
    <Image  UNID="&rsHammerheadIIGunshipHD;"
            bitmap="Resources\HammerheadIIGunshipHD.jpg"
            bitmask="Resources\HammerheadIIGunshipHDMask.bmp"
            />

</TranscendenceModule>
And with that, our ExtPlayership.xml file (v1.00) has been completed.
Part VI: Changing the Core Universe
Sooner or later, you will want to change the behavior of one of the core universe's items. Overwriting the core universe entities is tricky, not because it is any more difficult to change core content than it is to create new, but it is tricky because other modders may want to make changes to the core universe's entities as well. This introduces the very real possibility of non-compatible extensions.
While this is no reason not to change core content, it is considered good practice to:
- Clearly indicate which core entities you have changed;
- Clearly describe what changes you have made.
If you want your mods to be widely playable and broadly accepted by the modding community, paying meticulous attention to the above two rules is very important (some would say mandatory).
So, as an example, I'll show how to change the behavior of the &itDualRecoillessCannon; (the dual recoilless cannon), the standard weapon for both our player ship, as well as seven other ships in the core universe.
First search for the entity declaration of the &itDualRecoillessCannon; in the Transcendence.xml source file:
<!ENTITY itDualRecoillessCannon "0x00004013">
To signal that we will change this entity, I place a direct copy of the core universe’s entity declaration into our extension’s main file (HammerheadIIPlayership.xml):
<?xml version="1.0" encoding="utf-8"?>

<!DOCTYPE TranscendenceExtension
    [
<!-- MODIFIED CORE ENTITIES -->

    <!ENTITY itDualRecoillessCannon         "0x00004013">

<!-- HAMMERHEAD-II PLAYERSHIP ENTITIES -->

    <!ENTITY unidHammerheadIIPlayership     "0xD1A10000">

    <!-- ship classes -->

    <!ENTITY scHammerheadIIPlayer           "0xD1A13001">

    <!-- item types -->

    <!ENTITY itSmallMinersCargoHold         "0xD1A14001">

    <!-- image and sound resources -->

    <!ENTITY rsHammerheadIIGunshipHD        "0xD1A1F001">
    <!ENTITY rsHammerheadIIArmor            "0xD1A1F002">
    <!ENTITY rsArmorHUDShip_HammerheadII    "0xD1A1F003">
    <!ENTITY rsHammerheadIILarge            "0xD1A1F004">

]>

<TranscendenceExtension
        (...)
        >

    (...)

</TranscendenceExtension>
This ensures that every other modder can easily spot which core universe entity we have changed in our extension and thus we have complied with best practice rule a.
Next, we create a new module file for our changed core universe entity. Following the naming scheme introduced earlier, we name our new file as follows:
- ModStdWeapons.xml: this file modifies existing core universe content (as opposed to introducing new entities).
- ModStdWeapons.xml: the changed entity was originally found in the source file StdWeapons.xml.
Within this new module file we include a copy of the original entity:
<?xml version="1.0" encoding="utf-8"?>

<TranscendenceModule>

    <!-- Dual Recoilless Cannon -->

    <ItemType UNID="&itDualRecoillessCannon;"
            name=               "dual recoilless cannon"
            level=              "3"
            value=              "1500"
            mass=               "5000"
            frequency=          "uncommon"
            attributes=         "MajorItem; NAMI"
            showReference=      "true"

            description=        "Twin recoilless cannons manufactured by
NAMI."
            sortName=           "recoilless cannon, dual"
            >

        <Image  imageID="&rsItemsNAMI1;"
                imageX="192" imageY="192"
                imageWidth="96" imageHeight="96"
                />

        <Weapon
                type=               "missile"

                configuration=      "dual"
                damage=             "kinetic:1d6+1; momentum1"
                fireRate=           "15"
                missileSpeed=       "40"
                interaction=        "80"
                lifetime=           "60"
                powerUse=           "50"

                effect=             "&efKineticBoltDefault;"
                sound=              "&snRecoillessCannon;"
                >
        </Weapon>
    </ItemType>

</TranscendenceModule>
Just as with any other module, we need to include it in our extension, before the changes become active:
<?xml version="1.0" encoding="utf-8"?>

<!DOCTYPE TranscendenceExtension
    [
<!-- MODIFIED CORE ENTITIES -->

    <!ENTITY itDualRecoillessCannon         "0x00004013">

<!-- HAMMERHEAD-II PLAYERSHIP ENTITIES -->

    <!ENTITY unidHammerheadIIPlayership     "0xD1A10000">

    <!-- ship classes -->

    <!ENTITY scHammerheadIIPlayer           "0xD1A13001">

    <!-- item types -->

    <!ENTITY itSmallMinersCargoHold         "0xD1A14001">

    <!-- image and sound resources -->

    <!ENTITY rsHammerheadIIGunshipHD        "0xD1A1F001">
    <!ENTITY rsHammerheadIIArmor            "0xD1A1F002">
    <!ENTITY rsArmorHUDShip_HammerheadII    "0xD1A1F003">
    <!ENTITY rsHammerheadIILarge            "0xD1A1F004">

]>

<TranscendenceExtension
        UNID=           "&unidHammerheadIIPlayership;"
        apiVersion=     "22"
        name=           "Hammerhead II Playership"
        release=        "1"
        version=        "v1.00"
        credits=        "Pixelfck (Code), George Moromisato (Game art)"
        >

    <Module filename="ExtPlayerShip.xml"/>
    <Module filename="ExtDevices.xml"/>

    <Module filename="ModStdWeapons.xml"/>

</TranscendenceExtension>
Since I do not want to upset the game balance, I've chosen to only create a visual change: I will change the weapon's configuration from dual to alternating. A side effect of this is that the weapon's rate of fire needs to be increased, or we would end up with less damage per second:
<?xml version="1.0" encoding="utf-8"?>

<TranscendenceModule>

    <!-- Dual Recoilless Cannon

    MODIFICATION:
        - Changed configuration from 'dual' into 'alternating'
        - Updated damage to make sure the modified weapon is equal to
          the original
        - Updated the item's description to indicate the change
    -----------------------------------------
    -->
    <ItemType UNID="&itDualRecoillessCannon;"
            name=               "Dual recoilless cannon"
            level=              "3"
            value=              "1500"
            mass=               "5000"
            frequency=          "uncommon"
            attributes=         "MajorItem; NAMI"
            showReference=      "true"

            description=        "Alternating recoilless cannons
manufactured by NAMI."
            sortName=           "recoilless cannon, dual"
            >

        <Image imageID="&rsItemsNAMI1;"
                imageX="192" imageY="192"
                imageWidth="96" imageHeight="96"
                />

        <Weapon
                type=               "missile"

                configuration=      "alternating"
                damage=             "kinetic:1d6+1; momentum1"
                fireRate=           "7"
                missileSpeed=       "40"
                interaction=        "80"
                lifetime=           "60"
                powerUse=           "50"

                effect=             "&efKineticBoltDefault;"
                sound=              "&snRecoillessCannon;"
                >
        </Weapon>
    </ItemType>

</TranscendenceModule>
Note that I've described the changes made to this entity in the comment that accompanies it. This is the easiest method to clearly indicate what has changed for each entity; and with this we have complied with best practice rule b as well.
And that was all folks. We now have created our very own edition of a player ship. The only thing left to do is publish our mod so that everyone can enjoy our addition to Transcendence!
VII: Publishing your Mod
Usually, people accompany their mod files with both a readme.txt and a changelog.txt file. The first describes what the mod is about, what Transcendence version the mod was created for and various other things the mod creator thinks worthwhile. The changelog lists the changes (if any) for any subsequent release of the mod. So, for now, our changelog.txt file is not all that interesting:
CHANGE LOG:
-----------

Version 1.00
- Initial release.
But who knows what changes I may think up in the future!
Nearly all mods are shared through the website Xelerus. Publishing a mod on http://xelerus.de is no more difficult than uploading a .zip file. Since a lot of people download and use many mods at the same time, it is a smart idea to put all your files in your zip file in a folder with the name of your mod. This makes sure that people who download and unzip your mod can more easily keep track of which files belong to which mod. So, the resulting .zip file for this tutorial mod will contain the following file structure:
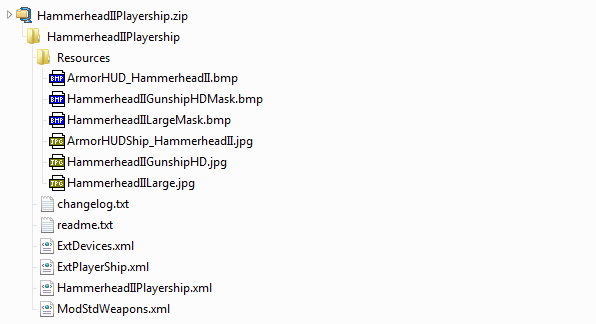
Although there is plenty more to discover, I think most of what you need to get started has been covered in this tutorial. Just remember, if you get stuck when creating mods, there are other modders out there on the forums to help you out!
Getting Started with Modding
By Jacco V. (Pixelfck)
Resources
TransData
Hammerhead II Player Ship Mod
Armor HUD Textures
Article in PDF Format
About Jacco V.
Jacco is a professional software engineer who quit his job to travel around the world (or Europe in this case) and do sports climbing whenever possible. He plans on staying on the road "until the money runs out" and in the meantime gets his programming fix by modding Transcendence.